Step-by-Step Guide to DIY Window Tint | Tint Your Car Easily
Tinting your car windows can be an easy and intelligent project that is money-saving and gives your car a fresh, cool appearance. Hiring a professional may cost too much money, but you can save that if you have skills and tools. Here, I will guide you on how to do a DIY window tint job with easy steps.
Table of contents
- What is DIY Window Tint?
- Tools and Materials for DIY Window Tint
- Preparing Your Car for DIY Window Tint
- Preparing the Tint Film
- Tint Film Positioning and Trimming
- Interior Prep and Film Application
- Final Steps for DIY Window Tint
- Tips for a Perfect DIY Car Window Tint
- Post-Tint Care and Maintenance
- Advantages of Car Window Tint DIY
- Conclusion
- FAQs
What is DIY Window Tint?
DIY window tint refers to applying a tint film to your car windows without needing to pay someone to do it. It is an excellent DIY project for those who wish to acquire new skills and save money simultaneously. By doing it yourself, you have complete control over the darkness or lightness of the tint. Many car owners prefer this approach, as not only is it more cost-effective, but it is also an enjoyable way to personalize your vehicle.
Tools and Materials for DIY Window Tint
You must have the appropriate tools and materials before you begin. With the proper tools, the job is simpler, and you can achieve a clean finish. These are the basics:
1. Essential Tools for DIY Tint
- Squeegee: This is used to push air bubbles out of the tint film.
- Utility Knife or Razor Blade: Trim the tint film neatly at the edges of the windows using this.
- Spray Bottle: Use to fill with a special application solution (commonly water blended with some soap) that enables the film to adhere to glass.
- Measuring Tape and Marker: Use to ensure measurements are precise and correctly aligned.
- Heat Gun: To facilitate curving film where necessary.
Based on a survey conducted by the International Window Film Association in 2020, over 60% of US car enthusiasts have attempted DIY window tinting, with many finding they can save over $100 compared to professionals.
2. Choosing the Right Tint Film
Selecting the appropriate tint film is crucial. Various films for various purposes:
- Standard Films: Best suited for general use and most in demand.
- Ceramic Films: Expensive but provide greater UV protection and heat reflection.
- Metalized Films: They reflect the sun quite effectively and provide a shiny finish.
Following are some actual numbers and facts:
- Cost: Basic tint film may be $30 to $50 a roll, with ceramic films roughly 2 to 3 times more costly. So, when you decide between ceramic tint and regular tint, compare the prices to make a decision.
- Durability: Properly maintained tint films are 5 to 10 years in duration.
- Popularity: In a study last year, an estimated nearly 45% of American drivers applied tint window car DIY on their vehicles to customize them. By using proper materials and tools, your work stands a better chance of succeeding.
Preparing Your Car for DIY Window Tint
Before applying any tint film, preparing your car windows is extremely important. This ensures that the tint will adhere well and appear smooth.
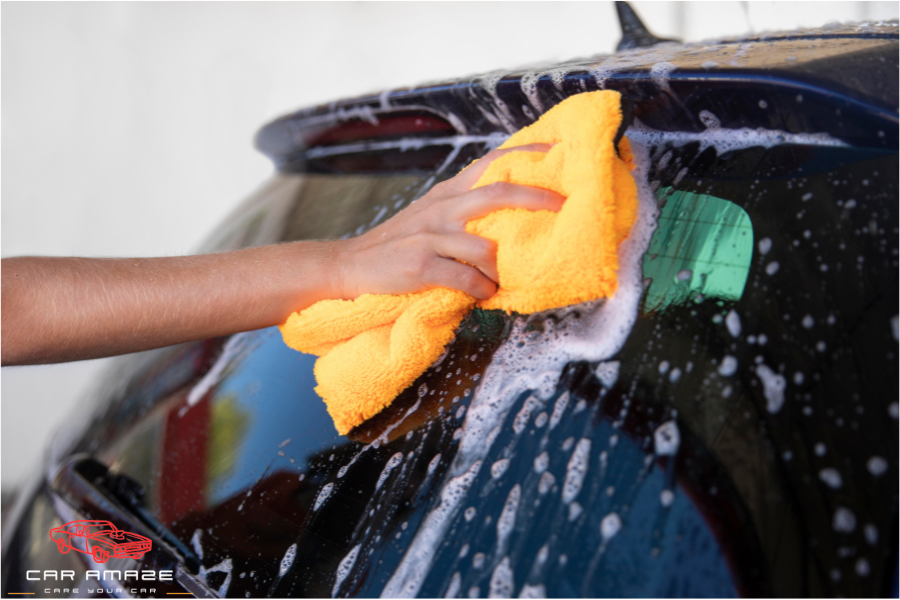
1. Clean Your Windows Thoroughly
Begin by cleaning your car windows. Apply a robust glass cleaner and a gentle cloth to clear away any dust, oil, or dirt. Any remaining dirt will create bubbles or streaks on your DIY window tint. Be sure to clean all four corners of the window, both the interior and exterior. This will ensure your tint film will have a flawless surface to bond with.
2. Dry Your Window Glass
Once cleaned, it is just as crucial that you dry the glass thoroughly. Dry the window with a lint-free cloth. Water spots may hinder the adhesion of the film to even out, and they could even cause uneven blotches after you apply the tint. Let the windows dry thoroughly to get a silky finish when working on DIY car window tint.
Preparing the Tint Film
After your windows are prepared, you must prepare your tint film for installation. This process requires some easy but necessary steps.
1. Identify the Liner Side
Most tint films have a protective liner on one side. The liner serves to safeguard the adhesive until you are ready to install the film. Be sure to understand which side is the liner and which side is the film. This is an important aspect of DIY window tinting since installing the film backward will destroy your project.
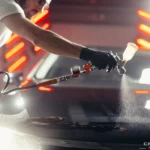
2. Spray Window with Application Solution
Then, spray the window with an application solution. This solution is typically a combination of water and a small amount of soap. The solution makes the tint film go in smoothly and does not let it stick too fast. It also lets you move the film’s position if needed. This process is a favorite among those who attempt DIY tint window car projects because it smooths out the application process.
3. Map the Liner for Positioning
Upon spraying, carefully position the tint film on the window with the liner intact. Read through the instructions on how the film should be placed on the window. What this implies is that you get to examine the shape and the dimension of the window and create a mental or physical marking if necessary. Mapping the liner ensures that once you take out the liner, the film should be in its correct position. This is a very important step for a clean finish when attempting DIY auto window tint.
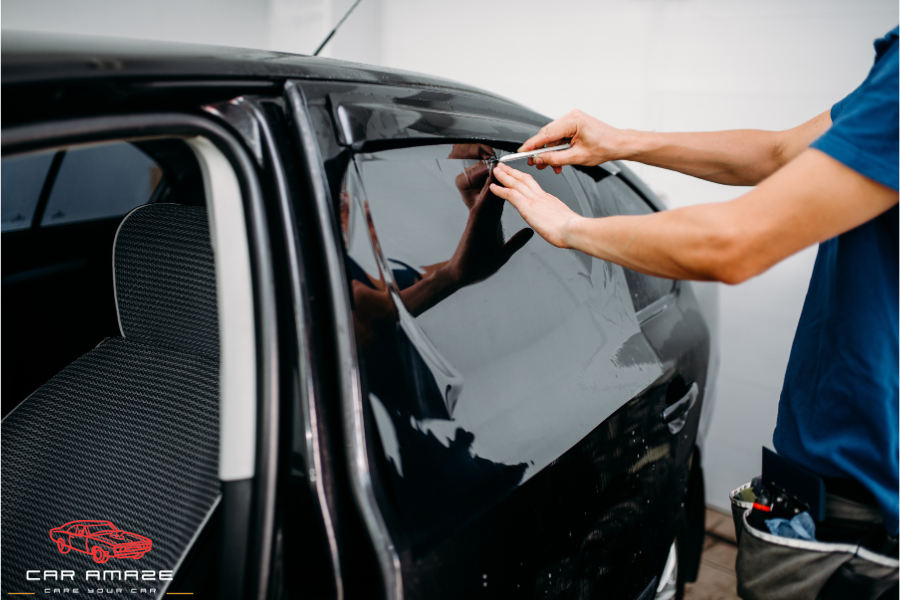
Tint Film Positioning and Trimming
With the tint film now prepped, it’s positioning and trimming time for a great fit.
1. Temporarily Position Tint
Put the tint film over the window, but don’t remove the liner. This is just a temporary alignment that enables you to check if the film spans the entire window and if there are any leftover parts that must be trimmed. Adjust the film to fit well. This is part of the DIY window tint process that ensures all is well before the installation.
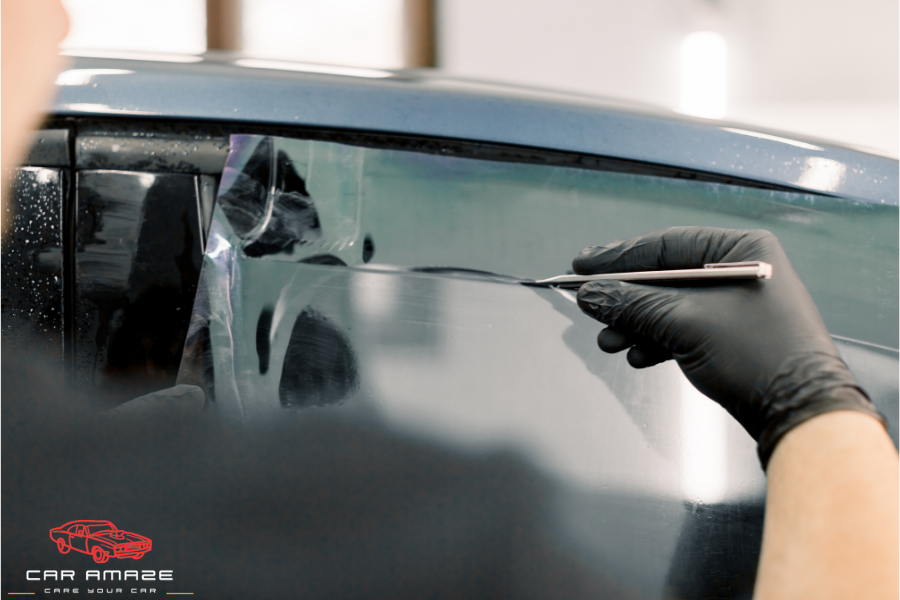
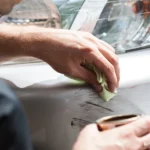
2. Cut Tint to Fit Your Windows
With a utility knife or a razor blade, slowly and carefully cut off any excess pieces of the tint film. Cut carefully and slowly, and do not make any errors. A clean cut will leave your DIY window tinting neat and professional-looking. Trim in small amounts first and then readjust if necessary.
3. Position Film Below the Tint Line
For a neater appearance, place the film below the tint line of the window. The tint line is where the tint should stop and is the portion of the window that indicates the end of the tint. This ensures the tint appears natural and uniformly applied.
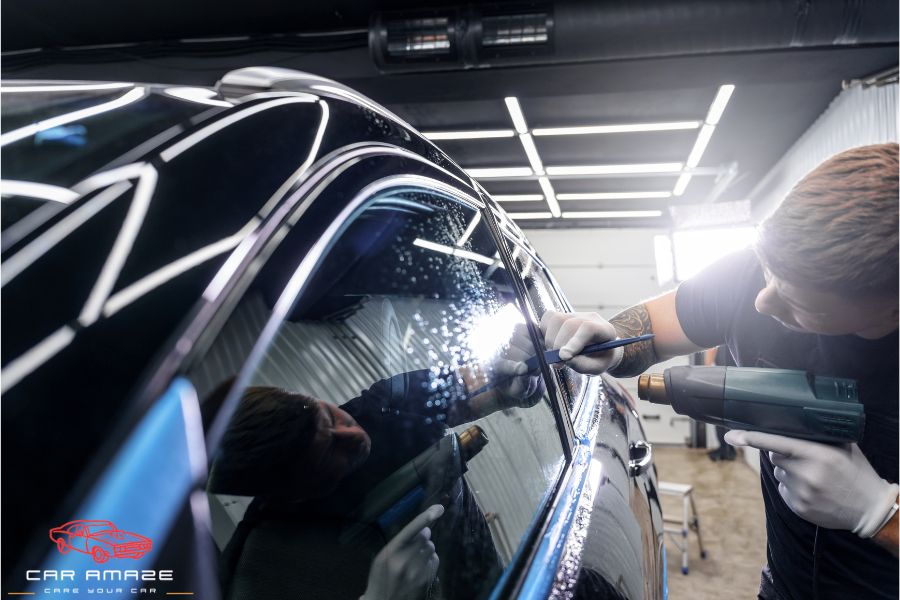
4. Trim Window Tint Film
Once you have the film installed, cut it again along the edges to ensure that it fits precisely. A minor error here can be corrected by cutting off the excess film with care. Trimming is an important aspect of DIY car window tinting work, making the film appear clean and professional.
5. Roll Down the Window for the Top Trim
For curved-top or specialty-shaped windows, roll the window down partially. This will provide you with greater access to the top of the film. Trim the top of the tint film to the shape of the window carefully.
6. Trim Film to Fit Glass Edge
Lastly, cut the film along the edge of the glass. Ensure that the film fits snugly with no loose ends overhanging the edge. This last cutting gives your car window tint DIY project a clean and professional finish.
Interior Prep and Film Application
Once the film has been trimmed and ensured to fit properly on the exterior of the window, it’s time to proceed with the inside. This will prepare the film so that it’ll stick properly and not have any bubbles or wrinkles.
1. Spray and Clean Interior Glass for DIY Window Tint
The inside of your car windows also needs to be thoroughly cleaned. Spray the interior with the application solution and then gently wipe it with a soft cloth. Cleaning the interior glass is crucial because it ensures the film adheres well and smoothly.
2. Dry the Interior Window
After applying the spray, dry the interior window thoroughly with a clean cloth. A dry surface will allow the tint film to adhere more strongly, minimizing the likelihood of bubbles being formed after the application.
3. Remove Liner from the Film
After the interior is dry and clean, remove the protective liner from the tint film carefully. Peel it off slowly while being careful not to damage the film. This is a critical point in DIY auto window tinting projects since the adhesive side is now ready to adhere to the clean glass.
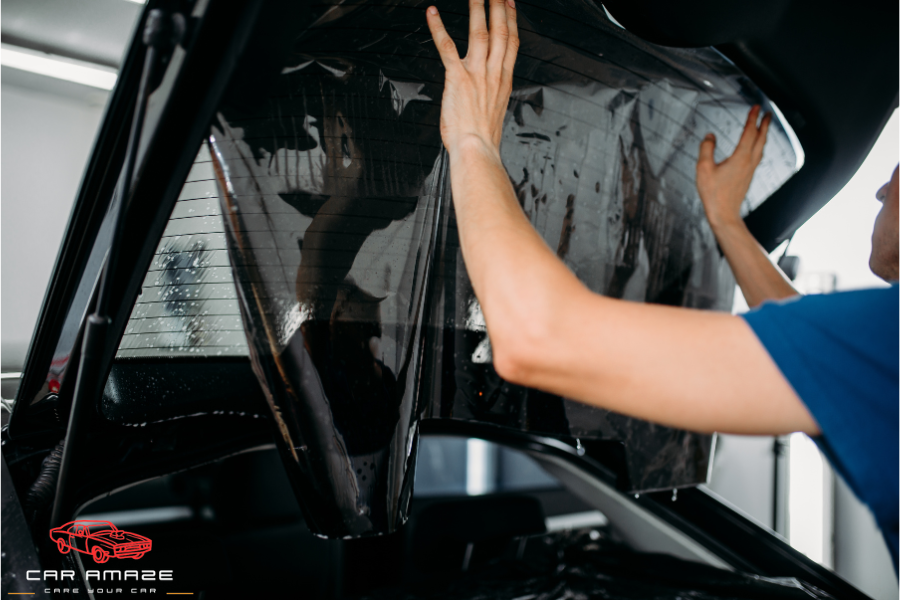
4. Apply Film with Application Solution
Once the liner is removed, apply a fine spray of the application solution to the window. Next, position the tint film on the glass slowly. The solution aids in gliding the film into place. Ensure that you begin at one end and work gradually across the window to prevent air bubbles from being trapped.
5. Slide Film into Position
Applying your squeezer, carefully move the tint film into position. This action helps eliminate air bubbles that can form. Work slowly and with tiny strokes to push the bubbles from the middle out towards the edges. The perfect technique for DIY window tint and high-quality materials ensure perfect installation and help you remove tint glue from car windows easily.
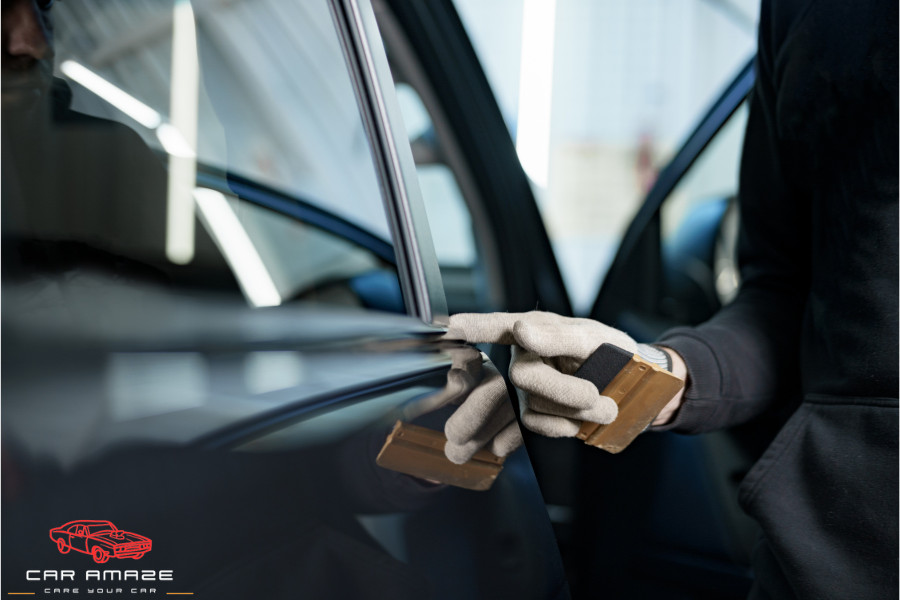
Final Steps for DIY Window Tint
The last part of the installation is all about ensuring that the tint film is well-stuck and looks immaculate.
1. Install Tint on Interior Window
When the film is properly aligned, strongly press it onto the interior of the window. Ensure that it adheres evenly over the whole surface.
2. Wet Window for Smooth Application
Spray a bit more application solution onto the window to keep the film wet. This even out any remaining wrinkles or bubbles. A wet surface enables the film to adapt and stick better, giving a good-quality finish.
3. Slide Film Behind the Gasket
For certain vehicles, you might need to slide the film behind the window gasket (the rubber seal surrounding the window). This provides the tint with a factory-installed appearance. Carefully lift the film and slide it into position without creating creases.
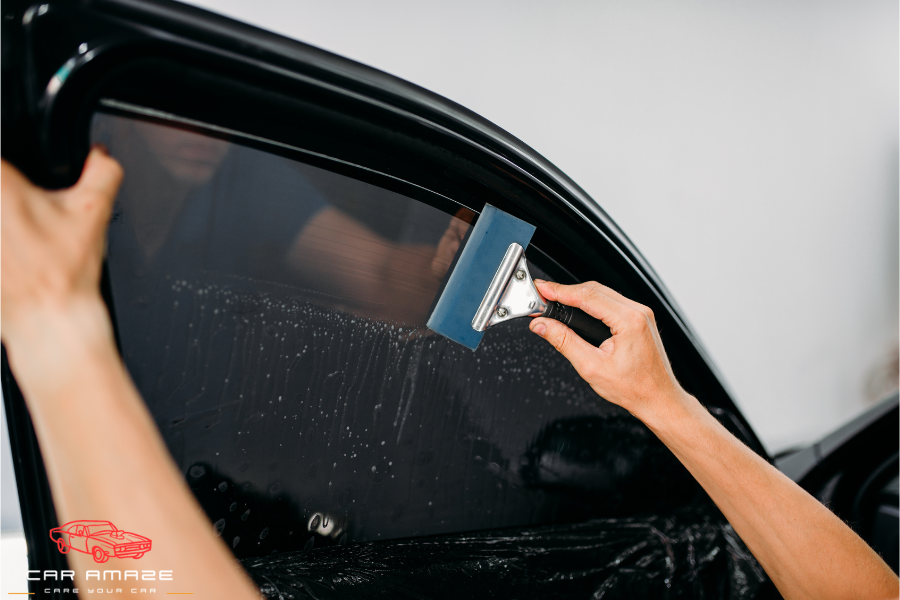
4. Remove Water and Bubbles
Lastly, apply your squeeze once again to dislodge any excess water or air bubbles from the tint. Proceed slowly and deliberately to force all the moisture out. This last step guarantees that your do-it-yourself car window tinting work is bubble-free and smooth.
Tips for a Perfect DIY Car Window Tint
Although the steps are easy, some tips can make your project even better.
1. Best Practices for DIY Tint
Work in a Dust-Free and Clean Area: This keeps the tint film clean and free of dust.
Use a Lot of Application Solution: Don’t hesitate to spray liberally to allow the film to slide.
Take Your Time: Rushing will cause errors. It’s best to work slowly and carefully.
Practice on a Small Window First: If you’re a beginner, start installing the tint on smaller windows before attempting it on larger windows.
Implementing these best practices can provide you with the perfect finish for your DIY car window tint job.
2. Common Tint Mistakes
Omitting the Cleaning Step: Failing to clean the glass properly can lead to bubbles.
Prying the Liner Off Too Hastily: This may cause the film to adhere prior to your readiness to align it properly.
Not Applying Enough Solution: Dry spots may result in uneven application.
Hurrying the Trimming Process: Cutting too fast leads to jagged edges.
By staying clear of these simple errors, you can guarantee that your DIY car window tint endeavor is successful and appears excellent.
Post-Tint Care and Maintenance
Once you have installed your tint film, keeping it well taken care of will make it appear fresh and smooth for a very long time. Whether you install normal tint, ceramic tint, or smart window tint on a car, maintenance is necessary.
1. Allow Tint to Cure
After completing the DIY window tint process, allow the tint to cure for a minimum of 2 to 3 days. This is a curing time that allows the adhesive to set nicely on the glass. Do not roll down the windows during this time. Curing is a critical process in DIY window tinting because it gives long-term results.
2. Clean and Maintain Tint
When your windows need cleaning, use a mild cleaner and a soft cloth. Don’t use abrasive cleaners that might scratch or ruin the tint. Maintaining the car tint will make it last longer and still protect the interior of your car from the sun.
Advantages of Car Window Tint DIY
DIY tinting your car windows has numerous benefits that make DIY tinting a favorite among vehicle owners.
1. Save Money with DIY Tint
Among the greatest perks of DIY window tinting is saving money. The cost of professional tinting can range from $200 to $400 or more, whereas DIY window tinting projects are usually done using materials priced below $100. This valuable saving is just one of the reasons that so many people prefer DIY window tint jobs. Not only will you save money, but you will also have the satisfaction of having done it yourself.
2. Boost Privacy and UV Protection
As well as saving money, tinted windows give added privacy in that it is more difficult for individuals to view inside your vehicle. Tinted windows also prevent dangerous ultraviolet (UV) rays from the sun, depending on the tint levels. Research has proven that high-quality tint films can prevent as much as 99% of UV rays, which will protect your car’s interior and your skin. This advantage makes DIY auto window tint a great option for anyone who wants to enhance their driving comfort and safety.
Conclusion
DIY window tinting is an easy and affordable project that can provide your car with a new, personalized appearance. With our easy-to-follow instructions, you can have a professional-looking finish even if you are a novice. If you want to save money or shield your car from the sun, DIY window tint is an excellent choice. Have fun, and before long, you will be cruising with confidence, knowing that you tinted your car yourself.
Remember, every step from washing your windows to the last bubble removal is critical to a successful tint installation.
FAQs
Can I tint my car windows myself?
Yes, you can easily tint windows on your own, but you must have the skills and necessary tools.
What tools do I need for DIY window tinting?
You will need window tint film, a squeezer, a heat gun, a razor blade, and soapy water. These tools help you to install the tint smoothly without any bubbles.
How long does it take to tint car windows at home?
DIY window tinting can take 2 to 4 hours, depending on your experience and the number of windows. If you have the experience and all the necessary tools, the tinting process will be completed quickly.
How do I prevent bubbles in my window tint?
To prevent bubbles during the tint installation, first clean the window and use soapy water to apply the film.
Is DIY window tinting legal everywhere?
The tint laws are different in each state, so you must confirm the legal rules where you live. In general, the lighter tints are allowed for the public, and darker tints are restricted.


Usually I do not read article on blogs, but I
wish to say that this write-up very compelled me to try
and do so! Your writing style has been amazed
me. Thank you, quite nice article.
Thank you for your kind words! We’re thrilled to hear that our DIY guide on window tinting caught your attention. Stay tuned for more articles on Car Amaze.