How to Tint Headlights | A Guide for Pro Tint Installation

Installing headlight tint gives your car a cool and stylish look. Knowing how to tint headlights professionally helps you get a perfect finish and avoid damage. Do you want to learn how to tint car headlights? Read this guide, where I have explained the required tools, installation steps, and safety tips for headlight tint installation.
Table of contents
- Why Tinting Headlights Enhances Your Car’s Look
- How Do You Tint Headlights? Materials Required
- How to Tint Headlights: Installation Steps
- Installation Tips for Headlight Tint
- Is Headlight Tinting Legal in Your Area?
- Benefits of Headlight Tinting for Your Vehicle
- How to Tint Headlights: Common Mistakes to Avoid
- Maintenance Tips for Long-Lasting Tint
- Conclusion
- FAQs
Why Tinting Headlights Enhances Your Car’s Look
Tinted headlights enhance the default look of car headlights and give your car a sleek and sporty look. You can customize the car’s looks depending on the color and design you choose for headlight tint. Other than the customization features, the headlight also protects your headlight from small scratches and UV damage. Due to this reason, many drivers choose this customization option, but it is necessary to know how to tint headlights.
How Do You Tint Headlights? Materials Required
Before starting the tinting process, you must gather the required tools and tint film. Good-quality materials ensure better results. Here is the overview of the necessary equipment and material required for tinting the headlights of your vehicle:
Essential Tools for Headlight Tinting
Before learning how to tint headlights, gather these items:
- Tint film or headlight tint spray
- Spray bottle with soapy water
- Microfiber cloth
- Heat gun or hair dryer
- Sharp utility knife
- Squeegee
- Masking tape

These tools help you apply headlight tint smoothly without bubbles or wrinkles.
Choosing Between Vinyl Wrap and Spray Tint
The first step in installing the headlight tint is to choose between vinyl film or spray tint. Vinyl film is like a sticker that you can easily apply and remove later on. On the other hand, spray tint is like spray paint that gives a smoother and more painted look, but it is difficult to remove. Moreover, vinyl is cheaper than spray tint. So, choose the right tint for your car headlight based on budget, style, and preferences.
Selecting the Right Tint Level for Headlights
When choosing the tint levels, make sure your lights stay bright and legal. Light smoke tints are best for visibility, whereas dark tints look bold but may block too much light. Before choosing the tint percentage, make sure that you follow the legal rules in your area. Make sure that the tint you choose provides a balance between safety, visibility, and style.
How to Tint Headlights: Installation Steps
Do you want to apply headlight tint like a pro? Follow these ten steps to learn how to tint headlights safely and professionally.
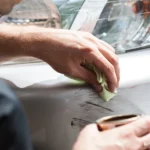
Step 1: Clean Thoroughly to Tint Headlights
Cleaning is the first and most important step for smooth and effective headlight tint installation. Use mild soap and water to wash away dirt, bugs, and grime. After that, dry the surface with a soft cloth and remove all dust particles or residue.
Otherwise, residue can trap air and may result in imperfect installation. Moreover, the tint sticks perfectly on a clean surface, lasts longer, and does not make it hard to remove car tint glue later on.
Step 2: Spray and Lubricate the Lenses
Fill a spray bottle with a mix of water and a few drops of baby shampoo. Spray a little bit of solution on the headlights. This process will make the headlight surface soapy, reduce the risk of creases, and simplify the tint installation. This lubrication makes it really simple to position the tint in the right place.

Step 3: Carefully Remove the Tint Liner
After lubricating the headlight surface, peel the protective backing (liner) of the tint film slowly and at a right angle. Avoid touching the adhesive side to keep it clean. Then, firmly hold the liner of the tint film and carefully pull the liner away. This process will expose the sticky side of the tint film, which will stick to the headlights.
Step 4: Align and Apply the Tint Film
The next step to tint headlights is centering the film over the headlight. Do not forget to leave a small overlap on all sides of your car headlight. Before you press the tint film, check its alignment from multiple angles and all sides. The more accurately you align the tint film, the better it will install on headlights.
Step 5: Spray Tint Evenly Over the Surface
The next step to apply headlight tint is misting the tint film slightly with soapy water. This keeps the adhesive active and lets you easily position the film and remove wrinkles. Do not apply too much of the solution because an excess of it can weaken the adhesive.
Step 6: Use a Squeegee to Smooth Out Bubbles
Have you put the headlight tint on accurately? If yes, then the next step is to remove bubbles. Start from the center position of the tint film and gently push the bubble toward the corners with a squeegee. Just apply the normal pressure to avoid tearing the film with the squeegee.

Step 7: Apply Heat to Secure the Tint
When you feel the bubbles are removed, activate the adhesive with heat. You can use a heat gun or hair dryer, but keep the heat source moving to avoid overheating at one spot. Warm the film until it shrinks slightly and hugs the curves of your headlight. The accurate heating will not only strengthen the adhesive but also lock the tint in place.
Step 8: Trim Away Excess Film to Tint Headlights
Now, it’s time to remove the excessive tint film from the corners using a sharp blade. Hold the blade at a shallow angle to avoid scratching the lens. Do not forget to clean the edges after trimming the tint film to get a smooth finish.

Step 9: Allow Tint to Cure and Check for Bubbles
Proper application of headlight tint requires some time. Leave the tint at room temperature for at least 24 hours. After completing this curing process, inspect the tint to check if there are any bubbles left and use the squeegee to remove them.
Step 10: Enjoy Your Newly Tinted Headlights
So, now you know how to tint headlights professionally. You can easily install headlight tint and enjoy a sleek and professional look. Installing the tint using the right material and technique enhances the durability and look of the tint.
Installation Tips for Headlight Tint
Follow these guidelines when learning how to tint headlights to get the best results:
- Apply tint between 70º and 80º F for optimal adhesion.
- Turn on the headlights for a few minutes to gently warm the lens.
- Ensure lenses are clean, dry, and free of debris.
- Spray the film continuously to keep it movable.
- Test adhesion with masking tape before full application.
- Avoid tinting in high humidity or rain.
- Handle vinyl film carefully to prevent wrinkles and tears.
Is Headlight Tinting Legal in Your Area?
Before installing the tint, you might be wondering if tinted headlights are legal or not. The legality rules are different in each state, but generally 70% VLT is permitted. Dark tints may be illegal or require special permits. Always check local motor vehicle department rules to know what legal car tint is before you begin.
Benefits of Headlight Tinting for Your Vehicle

Tinting the headlight offers many benefits only if you do not break the legal tint rules. Here are some of them:
- Tinting headlights offers style and protection in one upgrade.
- A smoky tint gives your car a custom, aggressive look.
- It also shields lenses from UV rays and small debris that cause cracking.
- It reduces glare and can improve nighttime driving comfort.
- Using suitable car tint colors, you can give your car a professional look.
- Plus, tinting the headlights is a very affordable option to enhance headlight looks.
How to Tint Headlights: Common Mistakes to Avoid
After knowing how to tint headlights, you must be careful about common mistakes. Watch out for these mistakes that can destroy the tint on the car headlights:
Skipping or rushing the cleaning step
Never skip or rush the cleaning process because small particles of dust can trap air bubbles under the film. Always carefully clean the car before applying headlight tint and dry the surface to make it spotless.

Over-lubricating with soapy water to tint headlights
Lubrication with soapy water is necessary to tint headlights, but over-lubricating is dangerous. Too much lubrication can weaken the adhesive and can cause peeling edges. Use just enough spray to let you position the film smoothly, then squeeze out excess water quickly.
Applying heat too aggressively or unevenly
Do not apply too much heat consistently in one place because it can warp or melt the tint film on the headlight. Carefully apply the moderate heat and keep moving the heat source in a circular motion.
Cutting without a guide
Cutting without a guide or structure leads to jagged edges or scratched lenses. Use masking tape as a straight edge and replace blades frequently for clean cuts.
Choosing a dark tint
Never choose too much dark tint because it will reduce the visibility and may cause legal penalties. Choose the permitted VLT level to tint headlights to avoid getting fined.
By avoiding these mistakes, you can easily apply headlight tint. The final installation of headlight tint will not only look perfect but will also last longer.
Maintenance Tips for Long-Lasting Tint
Other than knowing how to tint headlights, you must be aware of the maintenance steps. Follow these simple care habits:
- Gently wash headlight tints: Gently wash the tinted headlights using mild car shampoo and a soft microfiber. Also, avoid high-pressure water because it can lift edges and force dirt underneath the film.
- Regular inspections: Do regular inspections because they will help you find minor issues and avoid damages. Every month, look closely for tiny pulls, creases, or lifting corners.
- Shield from UV and heat: Too much exposure to sunlight and UV rays can harm the tint on headlights. Whenever possible, park under cover or in shaded areas.
- Dry fully after cleaning: Never leave the water drops on tinted headlights because they will become harder to remove. There are methods to get rid of water spots on car windows or glass, but still, it is better to avoid them.
- Avoid harsh chemicals: Never use harsh chemicals for cleaning or other purposes on the tint film. Stick to pH-neutral products designed for vinyl wraps.
- Reapply edge sealant if needed: Whenever you feel that the tint film is peeling from any side, reapply the edge sealant. Early identification and fixing will keep the tent safe from more damage.

With these maintenance tips, you will not only increase the lifespan of headlight tints but also keep them looking clean.
Conclusion
Learning how to tint headlights professionally helps you increase their lifespan and enhance their finish. Follow the 10 steps to install headlight tint, use the right tools, and avoid common mistakes to get a professional result. Moreover, do not forget to do regular maintenance of headlight tints.
FAQs
Can you put a tint on all the lights of your car?
Yes, you can tint the headlights, taillights, indicators, and brake lights, but you must follow the VLT rules. Just make sure to choose a light smoke shade that stays above legal light-transmission limits in your area.
Do smoked headlights reduce visibility?
Yes, smoked headlights reduce the amount of light by around 10-30 %. Always choose the lighter and high-quality tint to maintain enough visibility at night.
How to prep a headlight for tint?
First, wash the lens thoroughly with soapy water to remove dirt and bugs. Then dry it completely and wipe it with isopropyl alcohol to remove the cleaning solution. Finally, position the tint on the headlights and apply the headlight tint accurately.
What are the disadvantages of smoked headlights?
The main disadvantages of installing smoked headlight tint are lower nighttime visibility and increased glare for oncoming drivers. If you apply the too-dark smoked tint, you may get fines and inspection failure.


I am blown away by the depth and detail in your posts Keep up the excellent work and thank you for sharing your knowledge with us
Thank you so much for the kind words! I really appreciate you taking the time to read and leave such thoughtful feedback. I am glad you found the post helpful—more guides are on the way! 😊